
 Hugames Minesweeper
Minesweeper: advanced logical deductions and patterns
In denser grids, looking at a single isolated number is not always enough. To get unstuck, the trick is to look at two or three neighboring numbers at the same time. By combining their clues, you'll manage to find a certainty: either the exact location of a mine, or a completely safe square to open.
A practical example of logical deduction
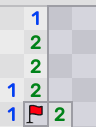 Here, we cannot deduce where the mines are
using the simple techniques. We have to make guesses.
Here, we cannot deduce where the mines are
using the simple techniques. We have to make guesses.
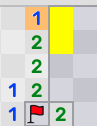 Let's look at the
1
highlighted in orange. It lets us deduce that there must necessarily be a mine
on one of the two squares highlighted here in yellow. We are going to explore both hypotheses.
Let's look at the
1
highlighted in orange. It lets us deduce that there must necessarily be a mine
on one of the two squares highlighted here in yellow. We are going to explore both hypotheses.
Hypothesis 1:
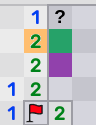 If there is a mine on the square marked with a question mark, we can deduce
that there is no mine on the green square.
If there is a mine on the square marked with a question mark, we can deduce
that there is no mine on the green square.Then, using the 2 highlighted in orange, we can deduce that there is a mine on the purple square.
Hypothesis 2:
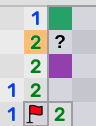 If the mine is on the other square, here marked with a question mark, we can deduce
that there is no mine on the green square.
And the
2
highlighted in orange lets us deduce that there is a mine on the purple square.
If the mine is on the other square, here marked with a question mark, we can deduce
that there is no mine on the green square.
And the
2
highlighted in orange lets us deduce that there is a mine on the purple square.
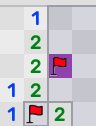 By comparing the two hypotheses above, we see that in both possible cases,
the purple square contains a mine.
By comparing the two hypotheses above, we see that in both possible cases,
the purple square contains a mine.
We are therefore now certain that this square contains a mine. We can place a flag on it.
The "1-2-MINE" pattern
The previous example illustrates the "1-2-MINE" pattern:
when a straight line of squares shows a
1,
then a
2,
then we can deduce
that the next square contains a mine.
It works every time!
It is very useful to memorize this pattern in order to quickly solve the most complex grids.
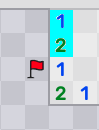
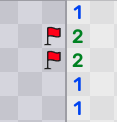
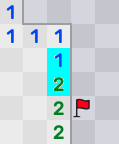 Here we see a
1
followed by a
2,
so we can deduce that the next square contains a mine (square marked with a flag)
Here we see a
1
followed by a
2,
so we can deduce that the next square contains a mine (square marked with a flag)
This technique works just as well horizontally as vertically, and in both directions. So we can use it from left to right then from right to left in the following example, and thus place two mines:
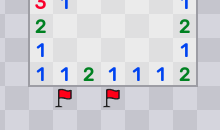
Same thing here, by applying the technique from top to bottom then from bottom to top.
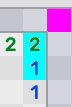
Be careful, this technique only works if the squares are in a straight line and with no other unrevealed square adjacent. Here, the pattern does not apply because there are unrevealed squares above the 2. So we cannot deduce anything in particular for the purple square.
The "1-1-CLICK" pattern
This other pattern applies only starting from an edge of the grid (or a similar situation, see below). When the first two squares are 1s, then the next square does not contain a mine.
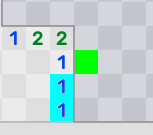 Here, the pattern applies to the two
1s
highlighted in blue; the next square, in green, therefore does not contain a mine.
Here, the pattern applies to the two
1s
highlighted in blue; the next square, in green, therefore does not contain a mine.
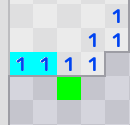 Another similar example.
And if, by freeing a square with this technique, you come across a
1
, then you can deduce
that the three adjacent squares on the opposite side do not contain a mine.
Example here, the three squares highlighted in green do not contain a mine:
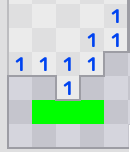
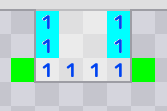 Another example of the 1-1-CLICK pattern.
The technique can be applied several times in a row, since the first freed square then creates a corner that lets you "restart" the 1-1-CLICK technique. Example here, the two squares highlighted in green do not contain a mine:
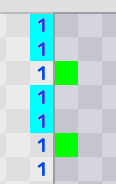
Be careful: as with the 1-2-MINE pattern, this technique only works if the squares are in a straight line and with no other unrevealed square adjacent.
Reductions
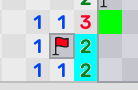
When a number has an adjacent flag, it can be considered as having a value reduced by 1.
For example here, the two
2
have an adjacent flag, so we can consider them as
1s.
This allows us to recognize the 1-1-CLICK pattern, and we can therefore free the square highlighted in green.
Another example:
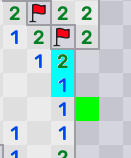 Note: here we are not on an edge, but on a corner, yet the 1-1-CLICK technique
can apply since all the squares above the
2
are known.
Note: here we are not on an edge, but on a corner, yet the 1-1-CLICK technique
can apply since all the squares above the
2
are known.
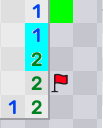
Another example: here we have placed a flag using the 1-2-MINE technique (from top to bottom).
This flag then acts as a corner, and by reducing the
2
to a
1,
we can recognize
the 1-1-CLICK pattern (from bottom to top), and therefore free the square highlighted in green.
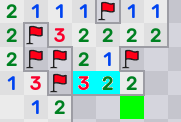
Another example: here the 3 reduces to a 1, the 2 too, and so we have the 1-1-CLICK pattern:
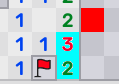
Another example: here the 2 reduces to a 1, and the 3 reduces to a 2 . So we can recognize the 1-2-MINE pattern, and place a mine on the square highlighted in red:
Play Minesweeper Online :